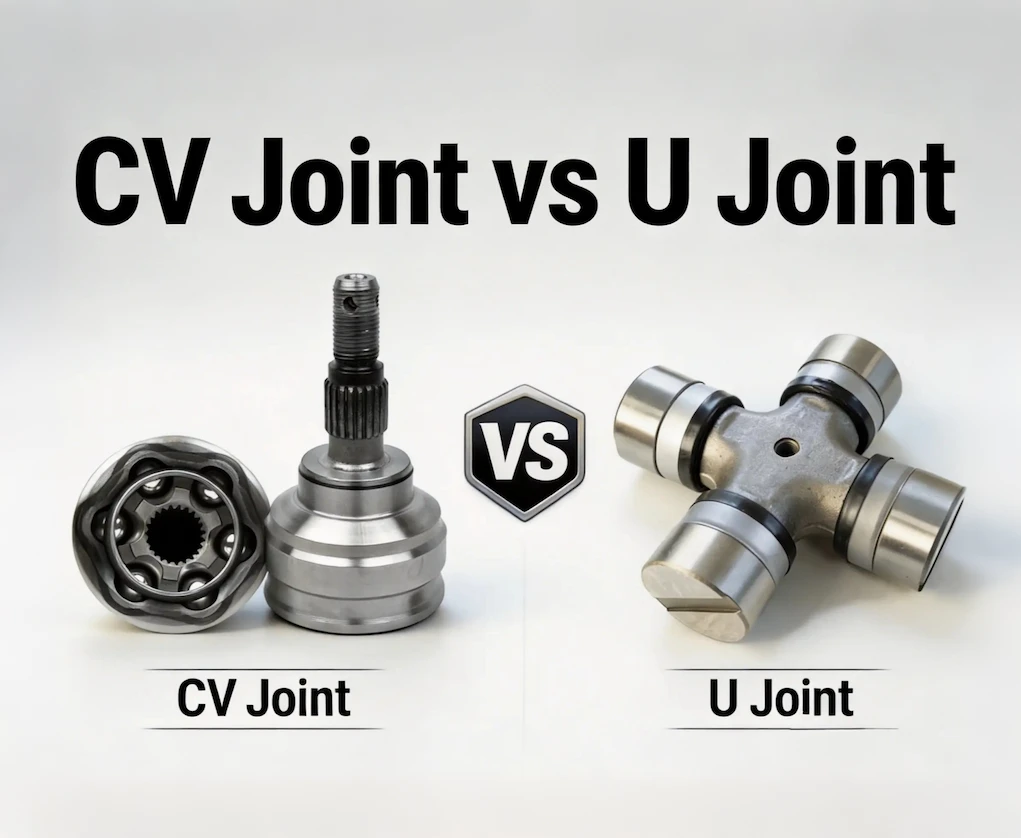

When you feel vibration at highway speeds, you usually check the tires or alignment, not the driveshaft. But after modifying suspension, engine, or horsepower, the factory driveshaft often becomes the weakest link. It may be the wrong length, have bad angles, or lack critical speed, leading to vibration and noise. At worst, the shaft can break, damaging your vehicle.
A custom driveshaft is not about making your vehicle faster. It is about keeping a modified vehicle safe, smooth, and reliable. This guide covers the full process, from deciding whether you need one to measuring and choosing the right components.
⚠️ Disclaimer: All specs in this article are general industry references only. Actual values vary by vehicle, materials, manufacturer, and region. Modify at your own risk and consult a professional when needed.
Table of Contents
When and Why You Need a Custom Driveshaft
Though the driveshaft is the backbone of your vehicle's drivetrain, not every vehicle needs a custom driveshaft. If you just drive daily and your car is completely stock with no modifications, a custom driveshaft is unnecessary. The key to deciding whether you need one is whether your vehicle has deviated from factory specifications. Here are 3 main scenarios:
- Lifting the suspension more than two inches
- Swapping to a transmission or rear axle of a different length
- Increasing horsepower output by more than 20 percent over the factory
These modifications change the driveshaft's operating length and angle, pushing the factory shaft beyond its design margin. In these cases, a custom driveshaft is highly recommended.
Even without major modifications, certain warning signs indicate you need to replace the driveshaft:
- You have replaced the U joints more than twice
- The driveshaft dust boot has dents or scratches
- There is noticeable axial play in the slip yoke
However, keep in mind that vibration issues do not always mean you need a new driveshaft. Out-of-round tires, warped brake rotors, and worn suspension bushings can also cause vibrations. If you have modified your suspension, changed your powertrain, or already experienced a driveshaft-related failure, then a custom driveshaft is no longer a blind upgrade. It is a necessary choice for safety.
Measuring, Designing, and Sizing Your Driveshaft
Measurement and design are the most important steps in the entire process. A poorly measured driveshaft can create severe vibration, damage transmission components, or even destroy a transfer case. Here is how to measure correctly and choose the proper materials and specifications.
How to Measure for a Custom Driveshaft Correctly
The most common cause of custom driveshaft failure is not product quality, but measurement errors. Follow these three steps to ensure your measurements are accurate.
Step 1: Prepare the Vehicle
Park the vehicle on level ground, with the full weight of the vehicle resting on the suspension. This is especially important for lifted trucks and SUVs because suspension droop dramatically changes the driveshaft length and angle.
Never measure with the axle hanging freely on a lift or jack stands under the frame.
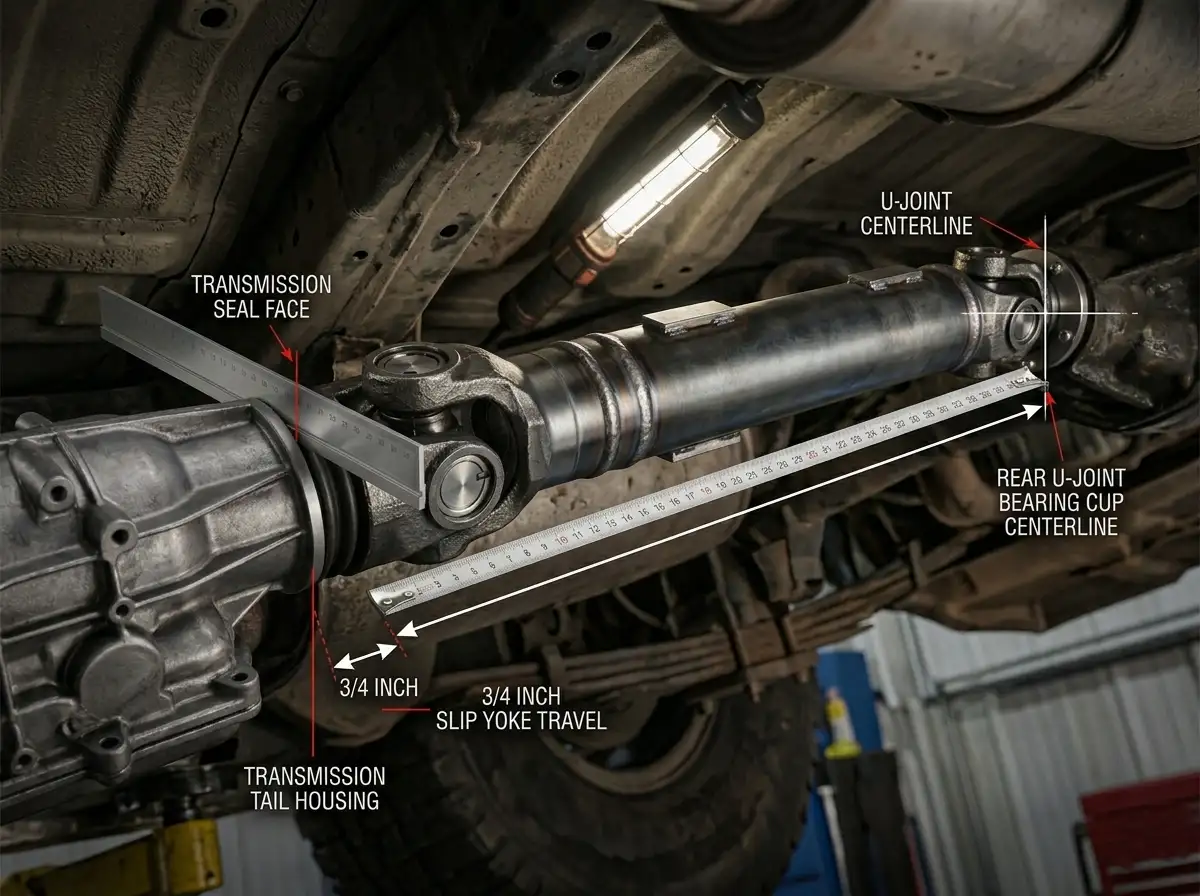
Once the vehicle is properly positioned, push the slip yoke fully into the transmission, then pull it back out approximately 3/4 inch to allow room for suspension movement.
Step 2: Measure Overall Length
Measure from the seal surface at the back of the transmission to the center of the U joint bearing cup on the rear axle yoke. This measurement determines the specifications for your custom-length driveshaft.
But getting the tape measure exactly on that center point can be tricky. A simple trick is to place a straight edge across the yoke face to create a precise reference point.
📚Related Reading:
How to Measure Drive Shaft Length for a Custom Driveshaft
Step 3: Confirm Joint Specifications
To ensure proper fitment and determine the correct series size (e.g., 1310, 1330, 1350, 1410), the manufacturer needs exact yoke and U-joint information. Please measure:
- U-joint bearing cap diameter
- Overall U-joint width
- Output shaft spline count
- Transmission seal diameter
Once received, these details will be used to identify the correct series size for your application.
Choosing the Right Components
Many people think a driveshaft is just a steel tube with two U-joints attached. In reality, material selection, tube diameter, wall thickness, and joint sizing directly determine durability, torque capacity, vibration resistance, and critical speed performance.
Material
- Steel: Heaviest but cheapest. Good for off-road driveshafts and towing applications.
- Aluminum: Lighter with a higher critical speed. Suitable for street driving and drag racing.
- Carbon fiber: Most expensive and impact sensitive. Limited to professional race cars.
For most modified vehicles, a steel or aluminum driveshaft is the most practical choice.
U Joint Series
- 1310: Factory replacement grade.
- 1330: Balances strength with vibration damping.
- 1350: Good for high-horsepower street cars.
- 1410: Designed for extreme off-road and heavy loads.
One common mistake is mixing a stronger rear joint with a weaker transmission-side joint. For example, pairing a 1350 rear yoke with a 1310 transmission yoke often causes the smaller joint to fail first.
If you want properly matched components, working with a custom manufacturer is important. Companies like Zeke Parts offer complete driveshaft customization and matched U-joint configurations for different vehicle setups.
Wall Thickness and Diameter
For the same length, a larger diameter and thinner wall thickness give you a higher critical speed. However, too large a diameter may rub against your exhaust pipe or fuel tank. As a rule of thumb, use 2.5 to 3 inches in diameter for under 300 horsepower, and 3.5 to 4 inches for over 500 horsepower.
Understanding Critical Speed
Critical speed is one of the most overlooked, but most important, concepts in driveshaft design. Think of a playground swing. If you push it at the exact rhythm of its natural motion, the swing oscillates more and more violently. A driveshaft behaves similarly.
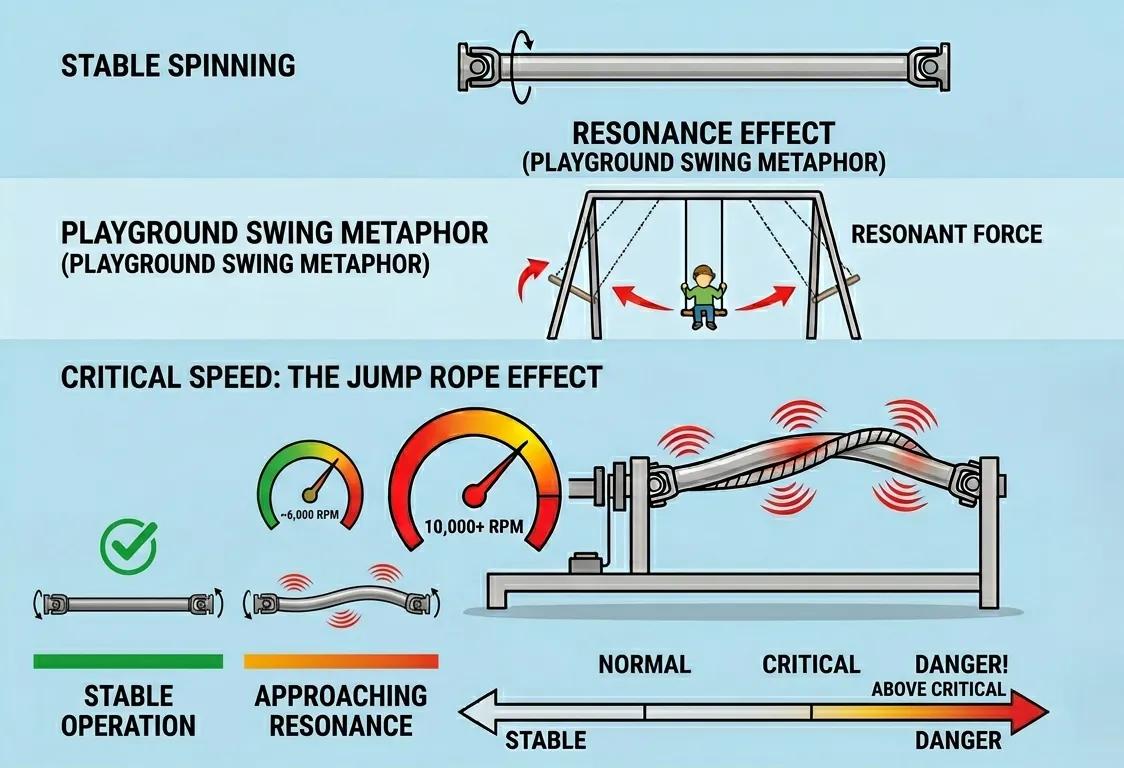
Critical speed is the rotational speed at which the shaft begins resonating and whipping uncontrollably. Once exceeded, the shaft can flex like a jump rope under the vehicle. That can destroy bearings, damage the floorpan, or even cause the shaft to separate. So, what determines critical speed? It mainly comes down to three design parameters of the tube itself:
- Tube length: The longer the shaft, the easier it reaches critical speed. A longer shaft is more flexible, so its natural bending frequency is lower.
- Tube diameter: The thicker the shaft, the higher the critical speed. A thicker shaft resists bending better, so the resonance point moves upward.
- Material stiffness: The stiffer the material, the higher the critical speed. Among common materials, carbon fiber is the stiffest, followed by steel, then aluminum.
With these three factors in mind, you can use a simplified formula to estimate critical speed in RPM:
Critical Speed ≈ 4,760,000 × Diameter ÷ (Length)²
The formula shows that a larger diameter raises the critical speed, while a longer length lowers it. This explains why many trucks and SUVs develop vibration at 75–90 mph: their long factory shafts approach critical speed under load. Therefore, upgrading to a larger-diameter one-piece driveshaft raises the critical speed threshold and eliminates the vibration, while a properly designed aluminum shaft does this by offsetting the slight reduction in material stiffness with increased diameter.
To stay on the safe side, there is a golden rule you should follow. As a general rule, your driveshaft’s critical speed should remain at least 15% to 20% above the maximum operating shaft RPM of the vehicle. If a manufacturer cannot provide critical speed calculations, that is usually a warning sign.
Where and How to Get a Custom Driveshaft
Once measurements and specifications are finalized, the next step is choosing where to have the driveshaft built. This matters more than most people realize. A poorly balanced driveshaft can create endless vibration issues even when measurements are correct.
Where to Go: Online vs. Local Shops
When custom-ordering a driveshaft, choosing the wrong channel is the second leading cause of failure, right behind measurement errors. You may find yourself scratching your head when deciding between ordering online and going to a local shop. Here is a breakdown of how both options compare to help you make an informed choice.
- Custom Driveshaft Online: If you are willing to spend half an hour taking precise measurements for a common model or standard lift kit, online ordering is a highly cost-effective choice. While this route offers a wide selection, transparent pricing, and highly experienced specialty manufacturers, the drawback is that you must bear full responsibility for any measurement mistakes.
- Local Driveshaft Shops: If you are unsure about your own measurements, have a highly customized project like a custom-fabricated chassis or an offset engine, or simply need the part turned around in a day or two, a local shop is clearly the better fit. Going local allows you to double-check dimensions on-site and communicate complex issues face-to-face, though this convenience usually comes with a 20% to 30% price premium, and smaller town shops might lack the updated equipment required for precise dynamic balancing.

Practical Advice: Measure locally, order online. The ultimate strategy is to pay a local driveshaft shop a small fee, typically $50 to $100, to take professional measurements for you. Once you have those bulletproof numbers, you can place your order with a reputable, specialized custom website. This hybrid approach lets you leverage the local shop to eliminate measurement risks while still capitalizing on the superior fabrication and advanced balancing equipment offered by top online builders.
How to Vet a Fabricator
The custom driveshaft market ranges from garage welders to million-dollar facilities. While you do not need to overpay for the most expensive option, you must know how to filter out unreliable builders.
When vetting a fabricator, ask these three critical questions:
- What equipment do you use for balancing? A reliable shop uses a dynamic balancing machine and can provide a balancing report.
- Do you calculate critical speed? Any hesitation or evasion here is a major red flag.
- What does the warranty cover? Reputable builders typically offer a one-year warranty on welds and materials, along with a lifetime warranty on balancing.
Be on the lookout for warning signs such as prices below 200 dollars, builders who do not ask for measurements, or shop photos lacking a balancing machine. When reviewing a balancing report, a tolerance within 0.1 ounce inches is excellent, up to 0.2 is acceptable, and anything over 0.3 is sub-optimal.
In terms of the cost of a driveshaft, market prices generally fall into these ranges:
- Steel shafts: 250 to 450 dollars
- Aluminum shafts: 350 to 600 dollars
- Carbon fiber: 800 dollars and up
- High-end or long custom builds: 1,300 dollars or more
Prices vary by application. For example, custom Jeep driveshafts often cost more than standard pickup shafts due to tighter angle requirements.
If you prefer a supplier that offers both standard and fully customized driveline solutions, Zeke Parts provides custom manufacturing support, application guidance, and component matching based on your vehicle setup. If you have any questions, just reach out anytime, and the team will get back to you within 24 hours.
Contact UsMachining Over-Sized or Specialty Shafts
While most custom driveshafts follow standard dimensions, certain modifications push manufacturing to its absolute limits. Examples include extended wheelbase pickup trucks or heavy-duty vehicles built to handle massive torque loads. Machining these specialized shafts requires a completely different approach, and not every shop is equipped to handle them.
A driveshaft is generally considered oversized or specialty if it falls into any of these categories:
- Length exceeding 72 inches
- Diameter exceeding 4 inches
- Wall thickness exceeding 0.25 inches
- Non-standard end configurations
Extra-long shafts can sag under their own weight and distort balance readings, while heavy-wall tubes often warp from weld shrinkage and require complex straightening. Most small shops lack the equipment to handle these issues.
Balancing a shaft this long requires a machine bed over 96 inches, and large diameter tubing demands a lathe with a spindle bore of at least 6 inches. If your project exceeds local equipment capacity, ordering directly from a major specialty manufacturer is the smartest move. Even with shipping costs, it is often more economical than dealing with repeated, failed re-runs locally.
When standard components fail under extreme torque, heavy-duty upgrades become a necessity. Zeke Parts addresses this demand with high-strength alloy steel driveshafts engineered specifically for maximum torsional strength and load capacity. This keeps the structural integrity intact under the most punishing loads. You can rely on our alloy shafts for tough loads.
Conclusion
A successful custom driveshaft project starts with accurate measurements, proper component selection, and a clear understanding of driveline geometry and critical speed. Proper material selection, tube sizing, and balancing quality all play a major role in preventing vibration, premature wear, and long-term driveline problems.
Spend an hour capturing your dimensions, and leave the rest to Zeke Parts. Zeke Parts handles full customization, offers factory tours, and provides sample shipments so you can inspect the quality firsthand. We respond to all inquiries within 24 hours, so feel free to reach out anytime!